The post How to Change the Primary Monitor in Windows 10 appeared first on Bound To Tech.
]]>If you use multiple monitor setup on Windows 10, you will notice that most programs open in a specific monitor and need to be dragged to your preferred monitor. That one specific monitor is set as the main display and will have the taskbar’s notification area. However, if you want to change the main display, you can easily do it by clicking a few buttons in the Display settings. In this article, we share the steps on how to change the primary monitor in Windows 10
How to Set a Display as Main Display in Windows 10:
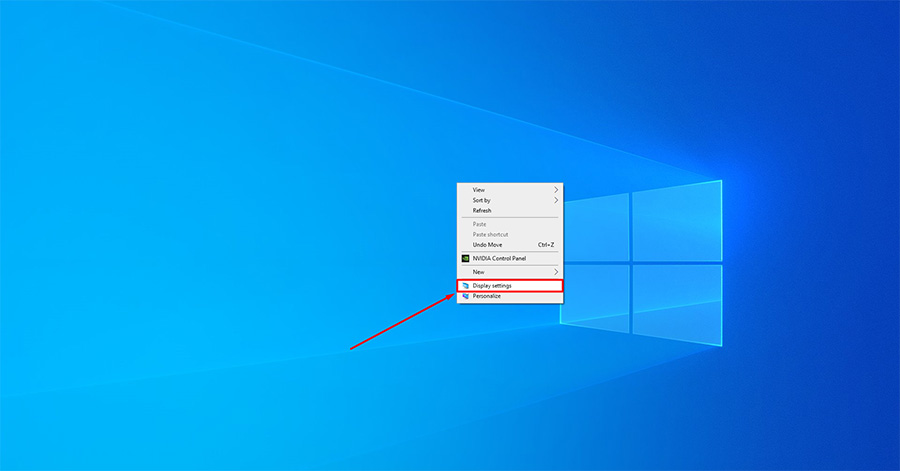
1. Right-click on the desktop and select Display settings.
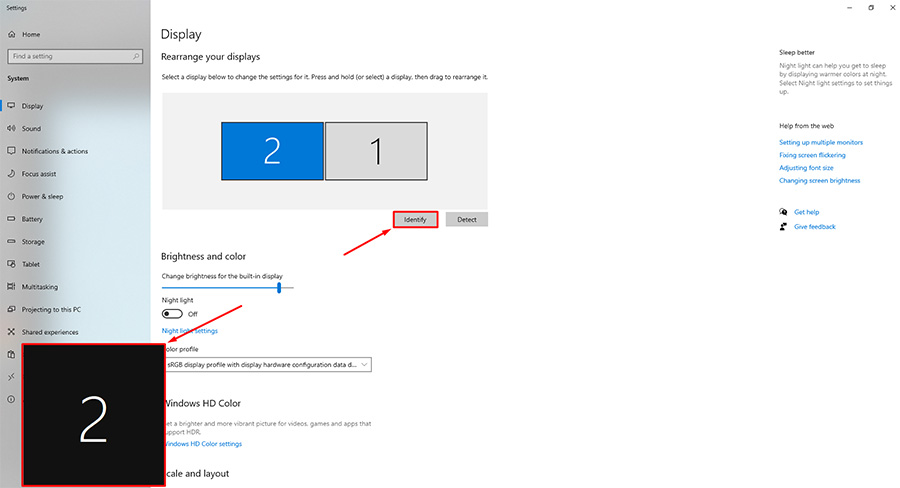
2. Click on the Identify button, which will show a number on all your monitors to make it easy to select the monitor in the next step.
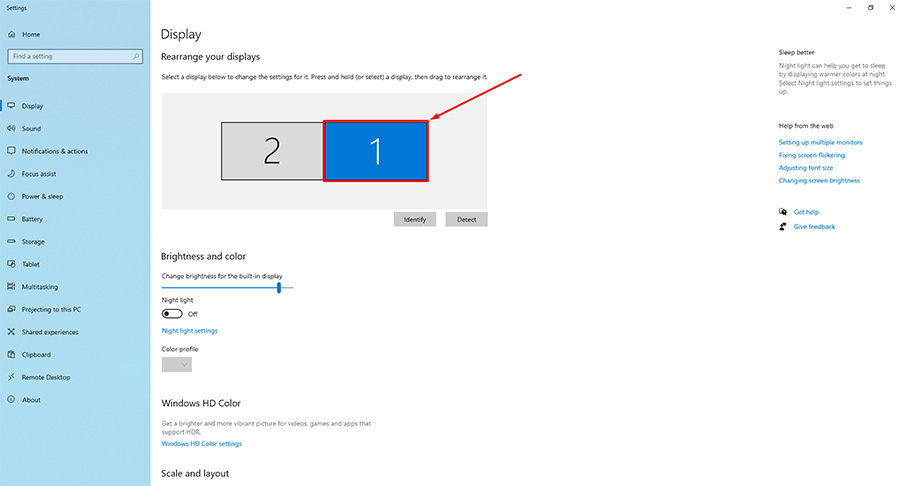
3. Select the monitor number you want as your main display.
4. Scroll down and under the Multiple displays section, tick the Make this my main display checkbox. And done, you have successfully changed your primary display monitor.

Note: Make sure you have selected Extend these displays in the Multiple displays drop-down menu, or else the Make this my main display checkbox will be grayed out.
The post How to Change the Primary Monitor in Windows 10 appeared first on Bound To Tech.
]]>The post How to Disable Fast User Switching in Windows 10 appeared first on Bound To Tech.
]]>Windows 10 offers a convenient way for users of the same computer to switch between multiple user accounts. The feature is called Fast User Switching, and it allows users to switch between accounts without signing out and closing the currently running programs. There are multiple entry points like welcome screen, Start menu, etc., for the Fast User Switching user interface. But if you want to disable Fast User Switching from these entry points, follow the steps in this article.
The method used in this article involves using a BAT file which is a script file format that executes command prompt (CMD) lines.
How to Disable Fast User Switching Using BAT File:
1. Download the Disable_Fast_User_Switching.bat file
Note: You may get this warning “This type of file can harm your computer” on your browser. You can safely ignore the message and select Keep to download the file.
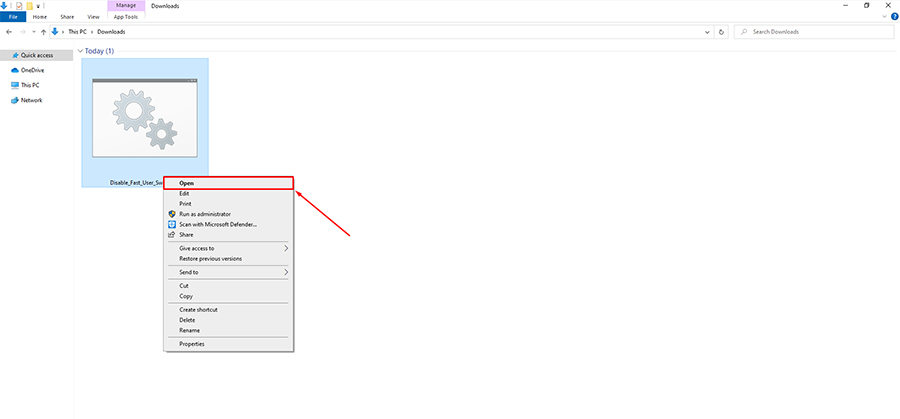
2. Once you download the file, you can either right-click on the file and select Open or double-click the file to open it.
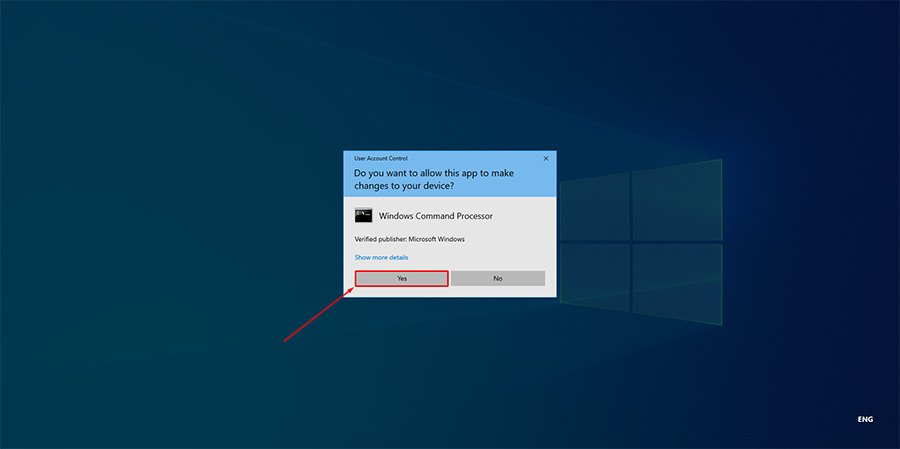
3. Click Yes on the User Account Control window.
4. The command prompt window will quickly open and close, and the screen will flicker for a few seconds. Fast User Switching should now be disabled.
Note: If you want to enable Fast User Switching, download the Enable_Fast_User_Switching.bat file and follow the steps mentioned above.
The post How to Disable Fast User Switching in Windows 10 appeared first on Bound To Tech.
]]>The post How to Disable Xbox Game Bar In Windows 10 appeared first on Bound To Tech.
]]>Xbox Game Bar is a screen capture feature in Windows 10 that allows users to record their screen or take a screenshot while gaming. Other than screen capture, Xbox Game Bar also has an option to control your audio level and access the chat widget for Xbox live. But if you are a system admin who would like to disable this feature for work computers, Microsoft has made it easy to turn on or off the Xbox Game Bar. In this article, we will share two methods to disable Xbox Game Bar in Windows 10.
Method 1: Disable Xbox Game Bar Using Settings
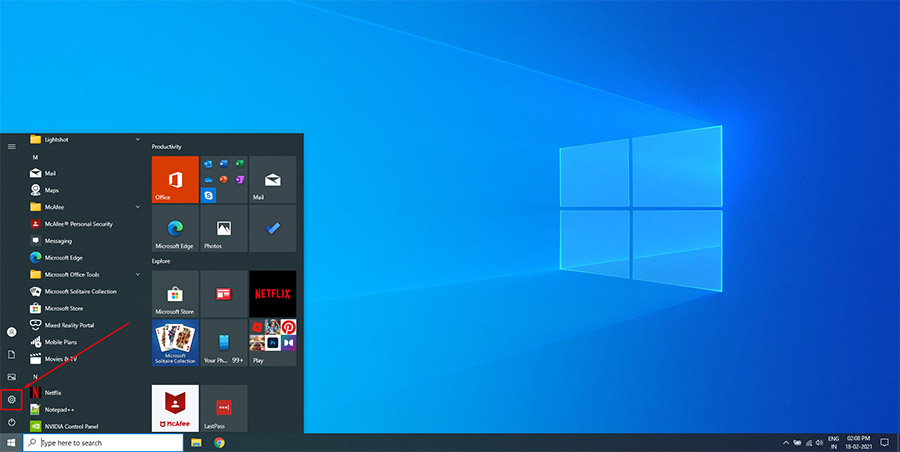
1. Go to Setting by clicking the Gear icon on the Start menu.
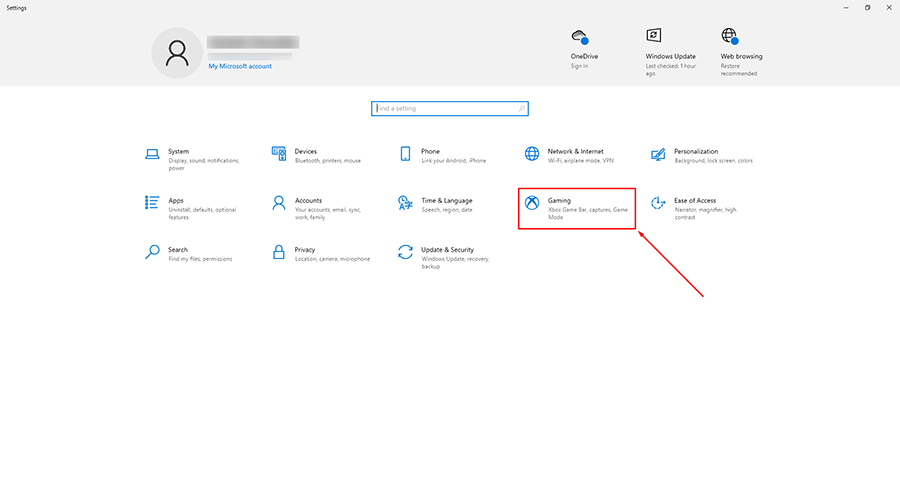
2. Click on the Gaming option in the Settings.
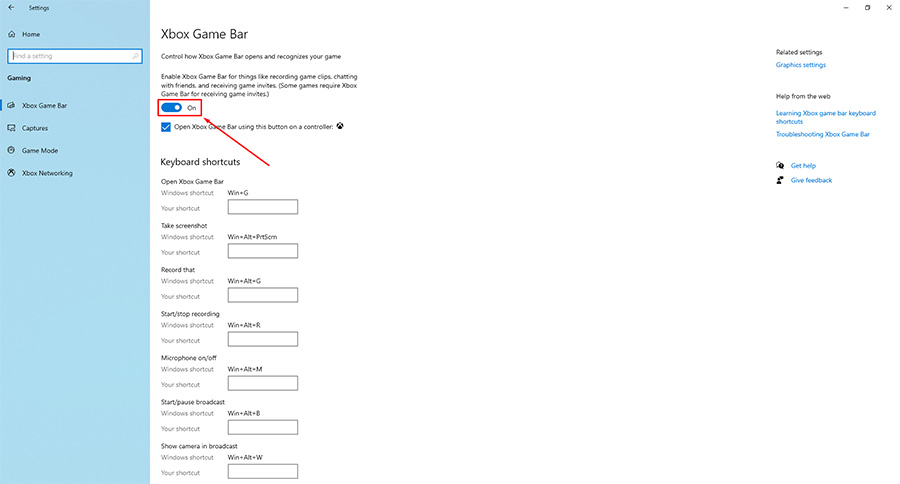
3. Make sure that you are on the Xbox Game Bar tab. There you should find the On/Off toggle button for Xbox Game Bar.
Method 2: Disable Xbox Game Bar Using REG file
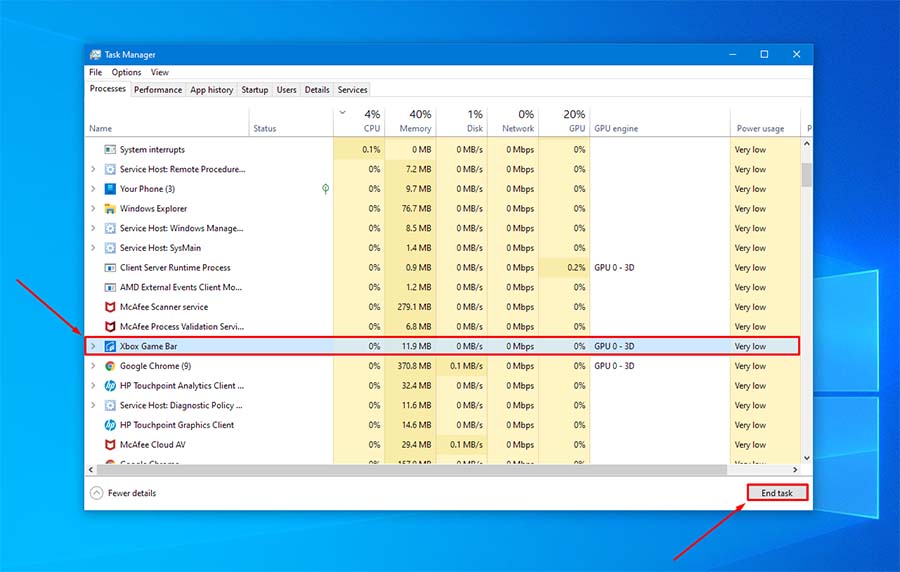
1. Close the Xbox Game Bar app using Task Manager.
2. Download the Disable_GameBar.reg file.
Note: You may get this warning “This type of file can harm your computer” on your browser. You can safely ignore the message and select Keep to download the file.
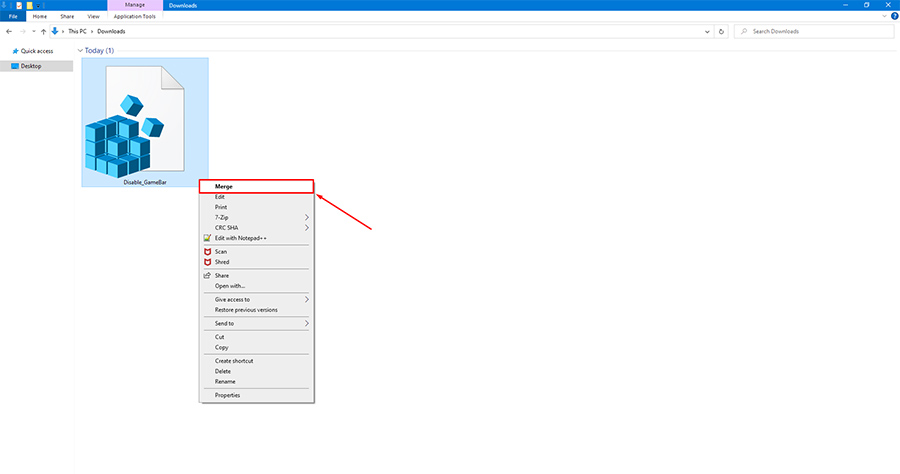
3. Once you download the file, you can either right-click on the file and select merge or double-click the file to open it.
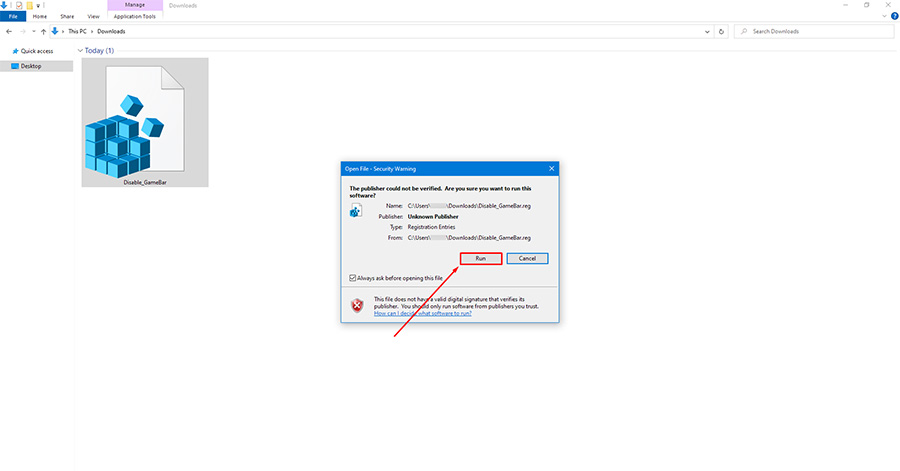
4. If Security Warning windows pop up, click on Run.
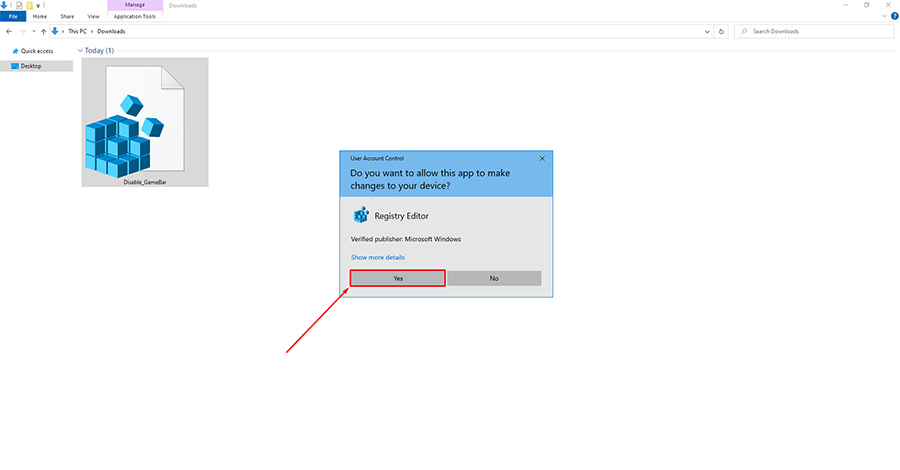
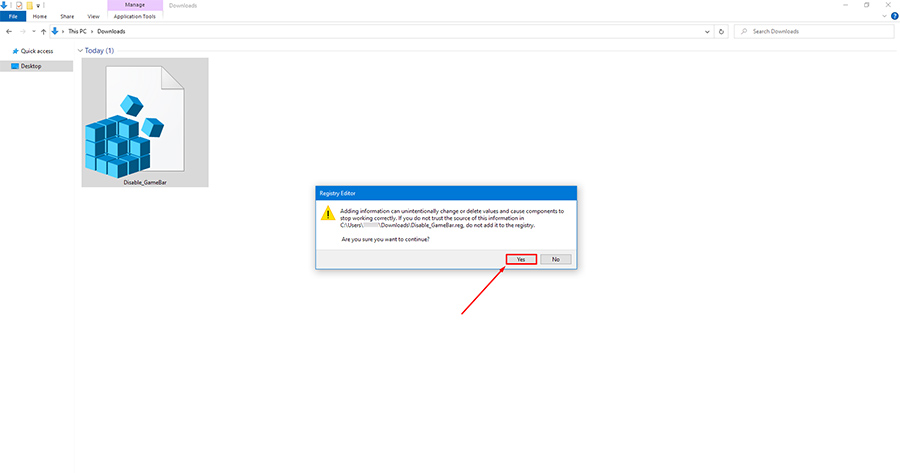
5. Now click Yes on the User Account Control window.
6. Click Yes on the Registry Editor window.
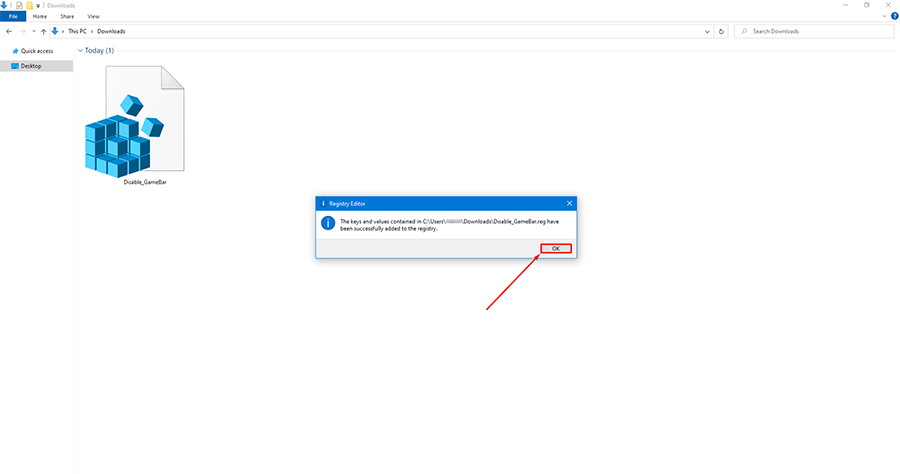
7. Now click OK on the Registry Editor window with the confirmation message. With this, the Xbox Game Bar should be disabled.
Note: If you want to enable Xbox Game Bar, download the Enable_GameBar.reg file and follow the steps mentioned above.
The post How to Disable Xbox Game Bar In Windows 10 appeared first on Bound To Tech.
]]>The post How to Import Favorites from Internet Explorer to Chrome in Windows appeared first on Bound To Tech.
]]>All browsers give an option to the users to save websites they regularly visit as a bookmark. In Internet Explorer, the feature of bookmarks is called Favorites. Suppose you are an Internet Explorer user and have decided to switch to Google Chrome, then it’s best to take your Favorites to the new browser. The developers of Chrome have made it easy to import your Favorites from Internet Explorer to Google Chrome. Just follow the steps in this article.
How to Import Favorites from Internet Explorer to Chrome:
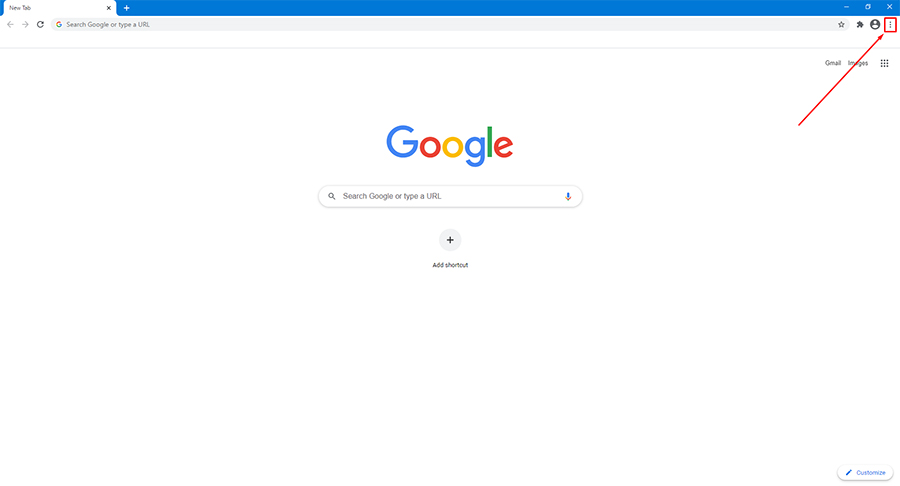
1. Open Google Chrome and click on the three-dot icon in the upper right corner.
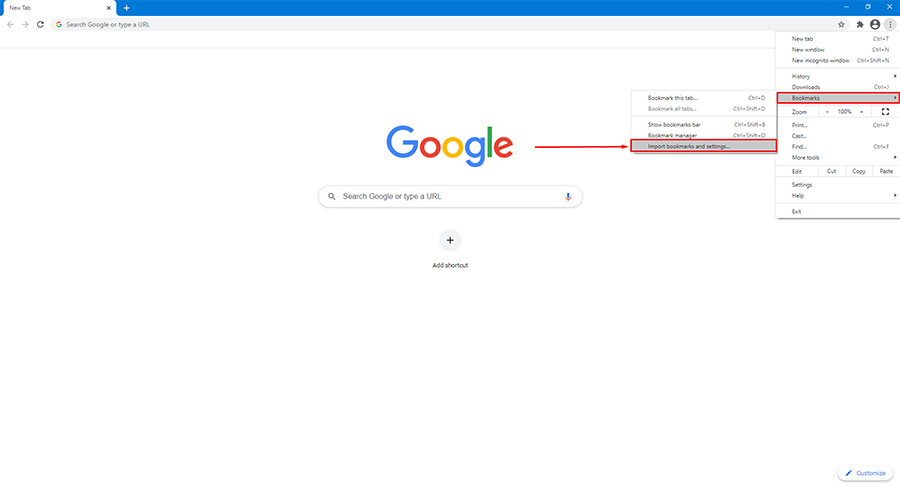
2. Click on Bookmarks > Import bookmarks and settings…
3. Select Microsoft Internet Explorer from the drop-down list.
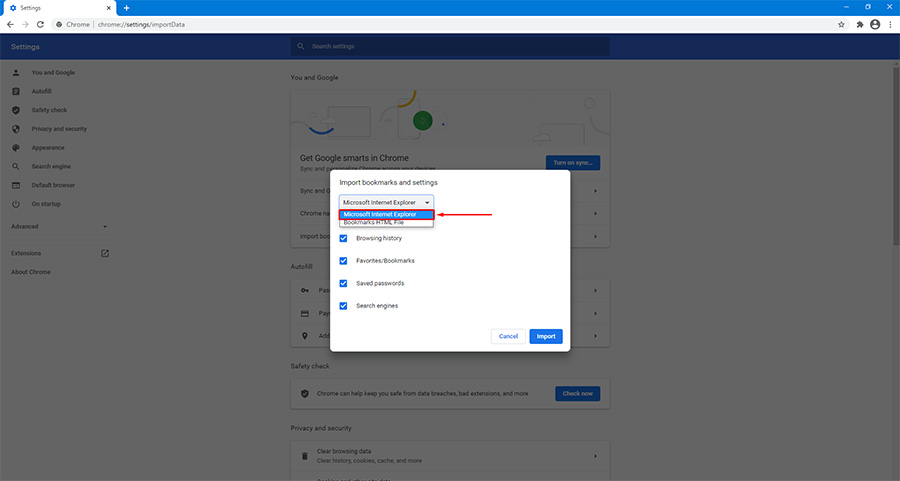
4. Make sure to tick the Favorites/Bookmarks checkbox. Optionally you can also import Browsing history, Saved passwords, Search Engines by ticking/unticking the checkbox beside them.

5. Click on Import.

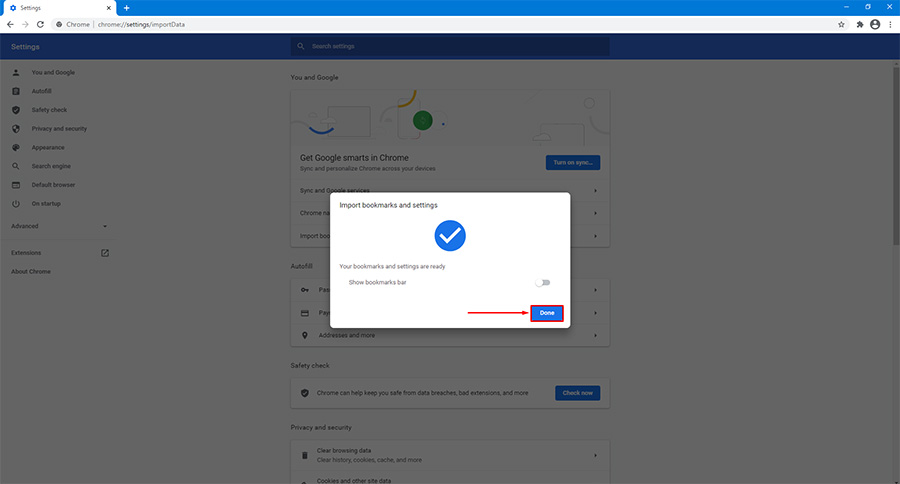
6. Click on Done. Optionally you can also enable/disable show bookmarks bar.
The post How to Import Favorites from Internet Explorer to Chrome in Windows appeared first on Bound To Tech.
]]>The post How to Check RAM Type, Size, and Speed in Windows 10 appeared first on Bound To Tech.
]]>Different computer motherboards support different RAM types, sizes, and speeds. If you are going to upgrade your computer and are on the hunt to buy a new system memory (RAM), you are probably wondering what type you should buy. You can always open up your computer and look up what kind of RAM it is currently using. But this will not work all the time because some motherboards have RAM built into it. Instead of opening up the computer, why not use software made for Windows to check your RAM type, size, and speed.
How to Check RAM Type, Size, and Speed in Windows 10:
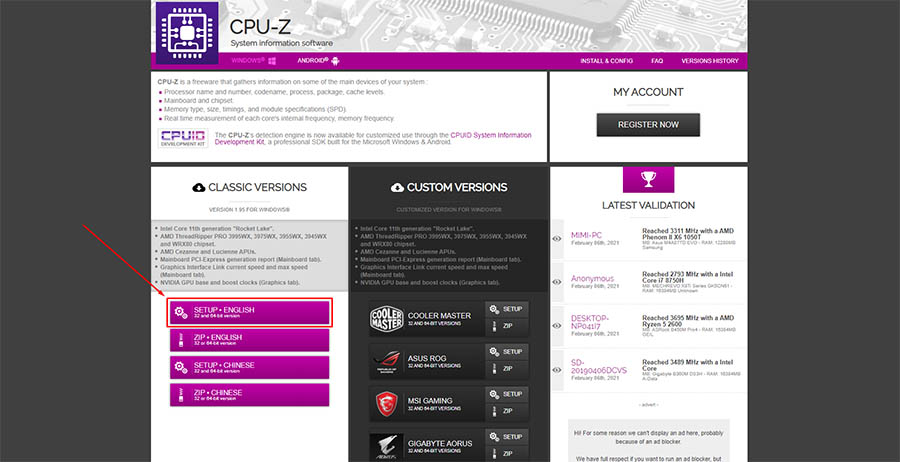
1. Go to the CPU-Z download page and click on the Setup English download button.
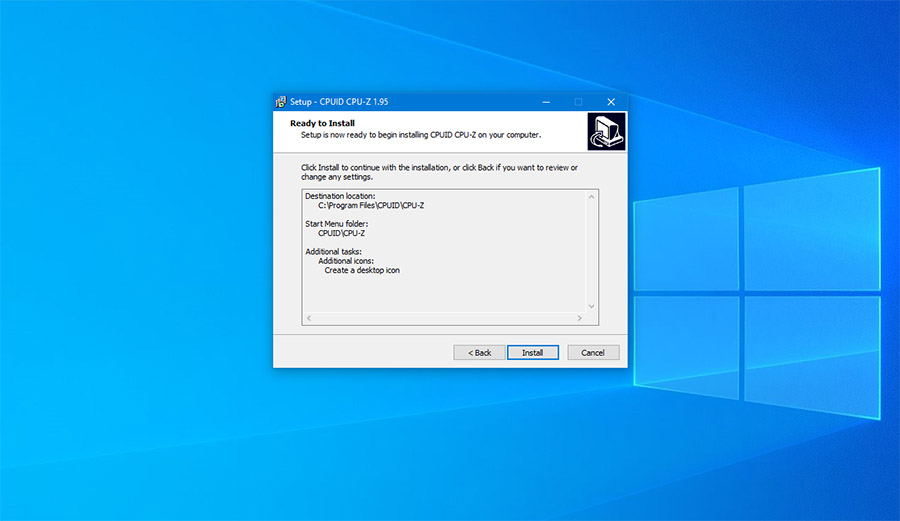
2. Download and Install CPU-Z
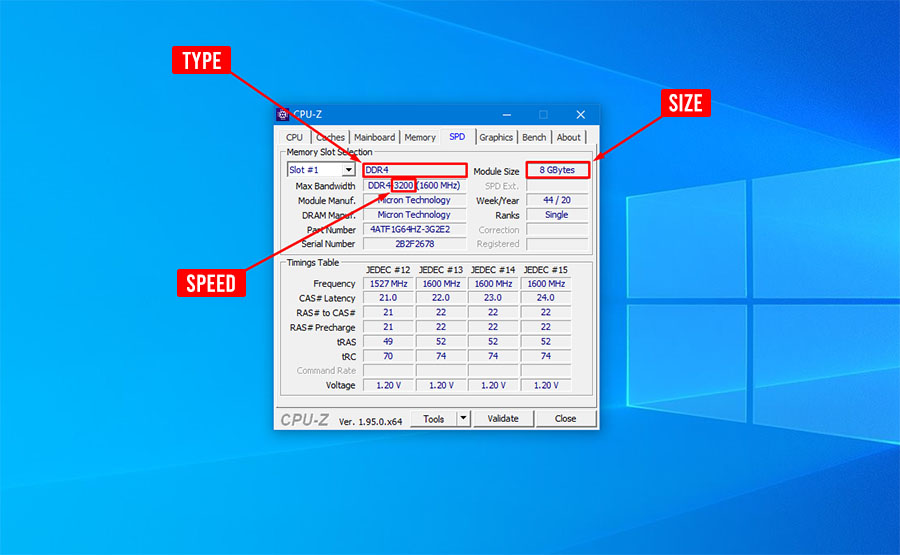
3. Run CPU-Z and click on the SPD tab
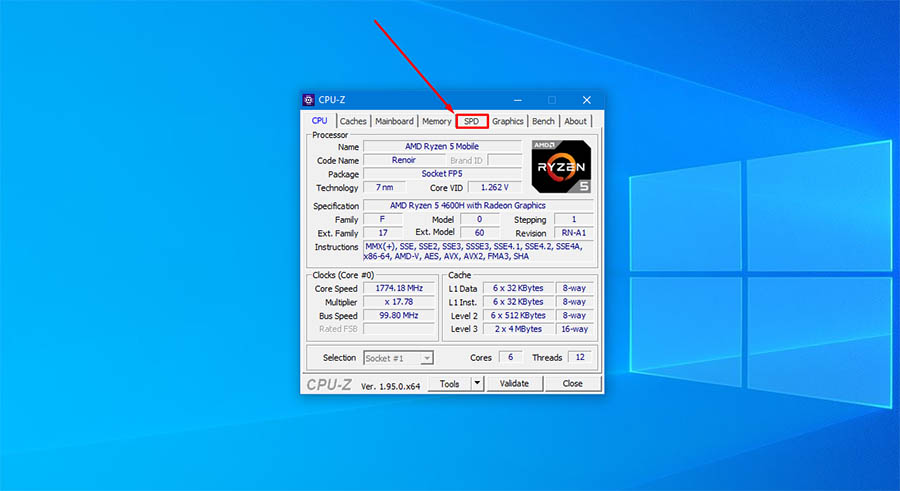
4. There you should find the RAM Type, Size, and Speed.
The post How to Check RAM Type, Size, and Speed in Windows 10 appeared first on Bound To Tech.
]]>The post What Is Windows10Upgrade Folder and How to Delete It appeared first on Bound To Tech.
]]>The Windows10Upgrade folder is created in the C: drive when you update to the latest version of Windows 10 using the Windows 10 Update Assistant. The Windows10Upgrade folder contains the program files related to the Windows 10 Update Assistant app, and usually, the size of the folder is around 19.9 MB. The best way to remove the Windows10Upgrade folder is by simply uninstalling the Windows 10 Update Assistant app. Follow the steps in the article on how to delete the Windows10Upgrade folder safely.
How To Delete Windows10Upgrade Folder in Windows 10:
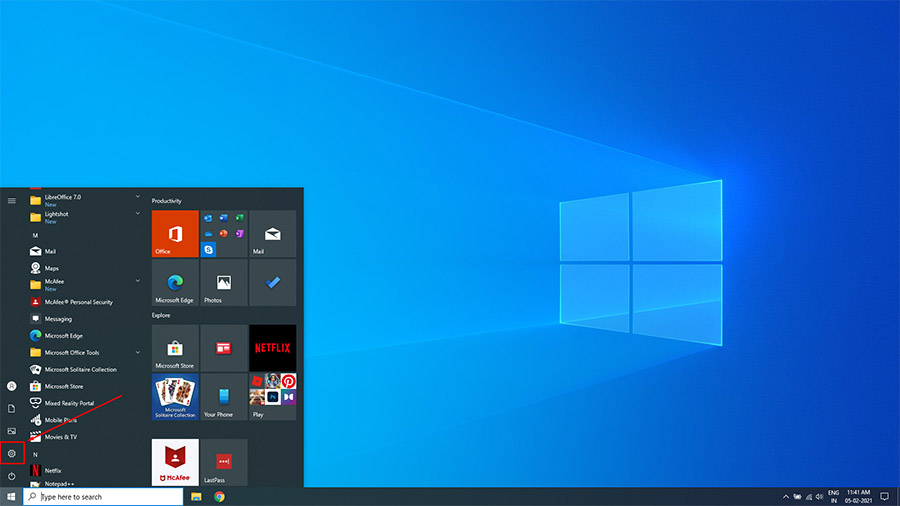
1. Click on the Settings icon in the Start menu.
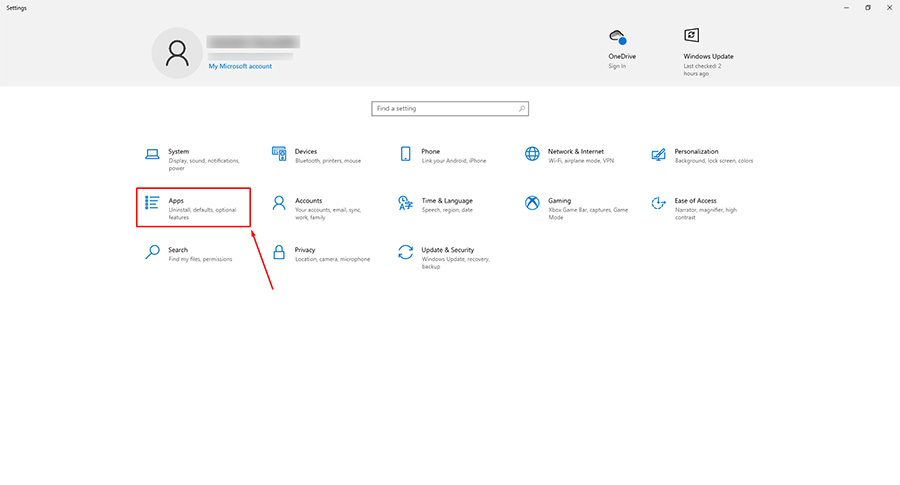
2. Click on the Apps button in the Settings menu.
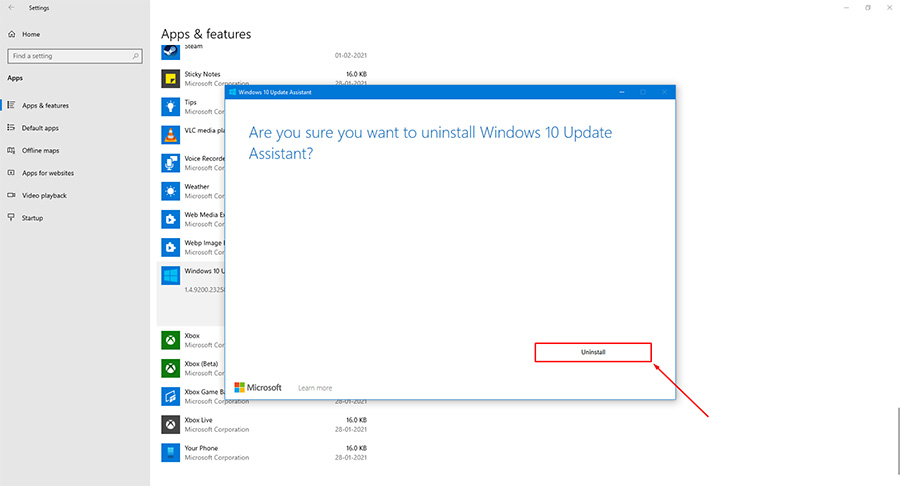
3. Scroll down the list of the apps and try to find Windows 10 Update Assistant.
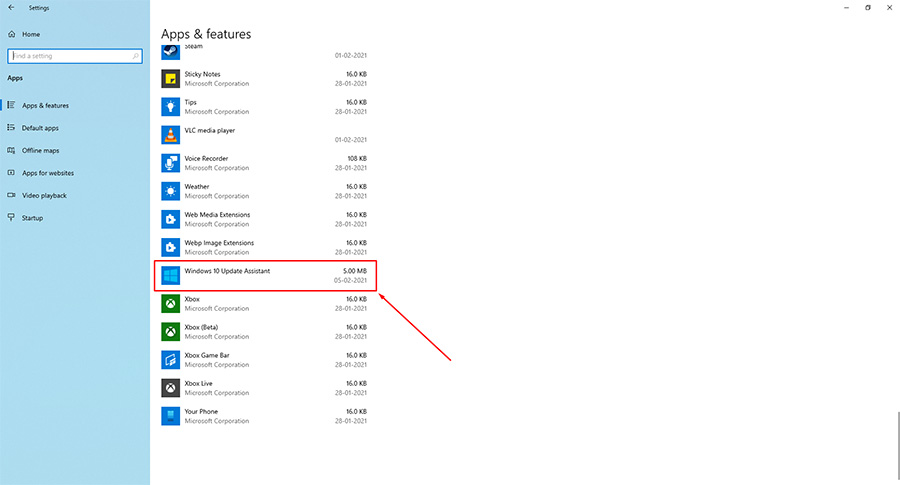
4. Select the Windows 10 Update Assistant app and click on the Uninstall button.
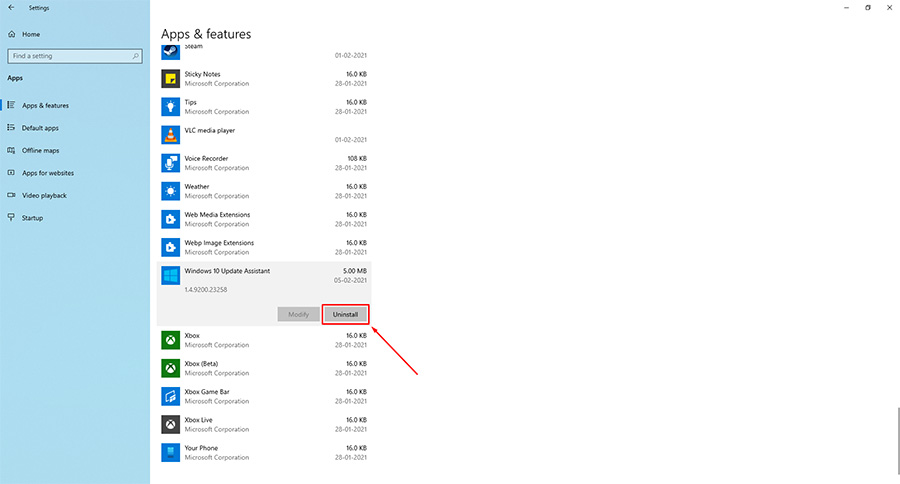
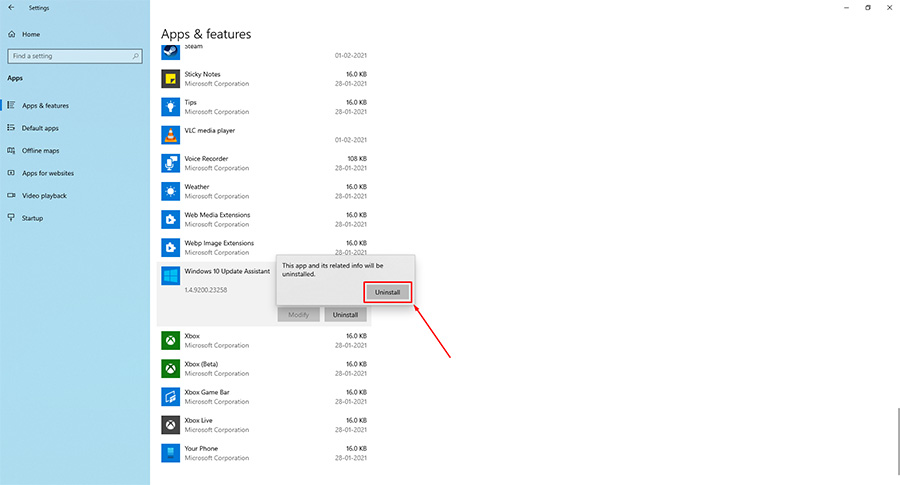
5. Again click on the Uninstall button.
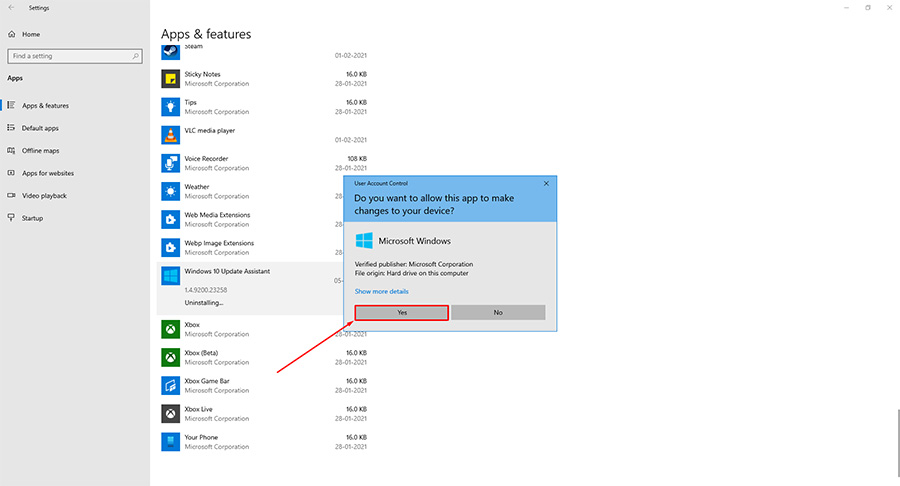
6. Click on Yes in the User Account Control window.
7. Click on Uninstall.
And you are done. The Windows10Upgrade folder should be now safely deleted from the C: drive.
The post What Is Windows10Upgrade Folder and How to Delete It appeared first on Bound To Tech.
]]>The post How to Create a Second Youtube Channel appeared first on Bound To Tech.
]]>YouTube is the biggest video sharing platform and offers users a way to upload their videos on their unique channels. Suppose you are a YouTube creator or user who wants to separate their personal account, then it’s best to create a new YouTube channel. You can create up to 50 channels with one YouTube account. Here in this article, we share a step-by-step guide on creating a second YouTube channel.
How to Create a Second Youtube Channel:
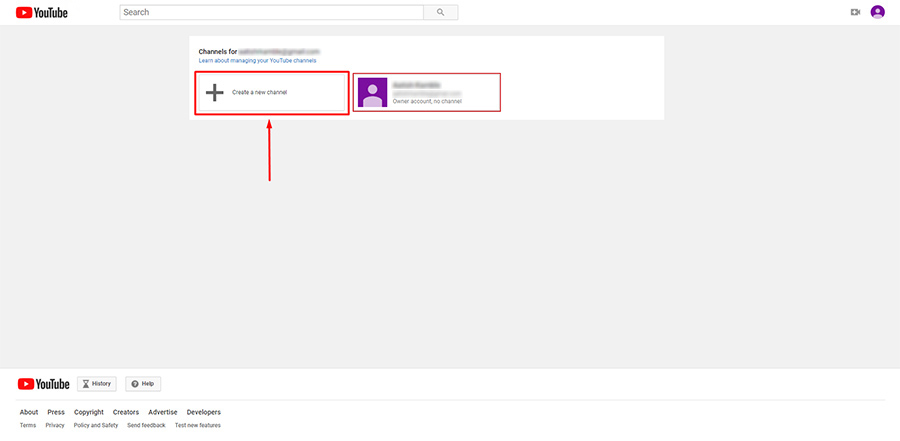
1. Login to your YouTube account and visit your list of channels.
2. Click on Create a new channel button.
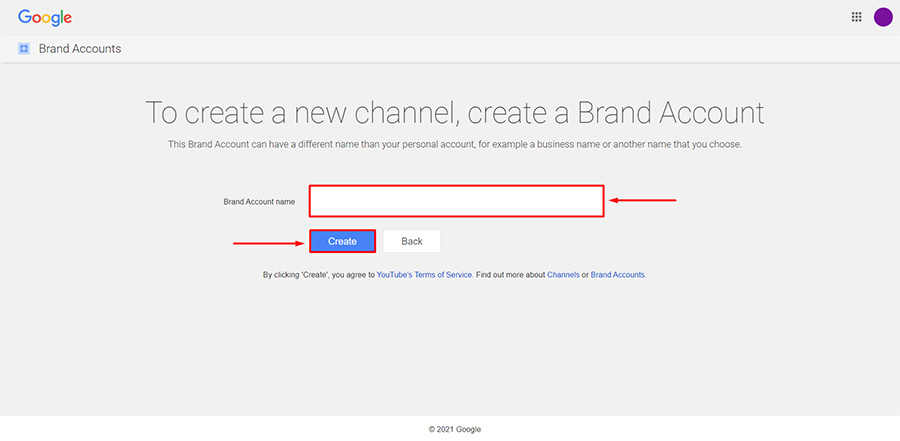
3. Enter the name of your new channel and click on the Create button.
4. You might get asked to verify the channel by entering your phone number to receive a verification code. Do the verification process.

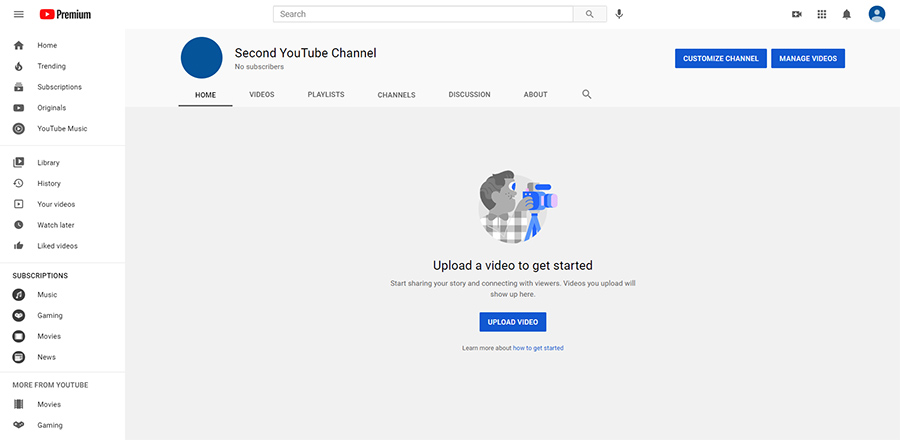
5. The new youtube channel is now ready for you to customise and upload videos.
The post How to Create a Second Youtube Channel appeared first on Bound To Tech.
]]>The post How to Convert Google Docs to PDF appeared first on Bound To Tech.
]]>Google Docs is now a go-to online word processor due to its ease of use and free pricing. Google Docs also offers various formats to download your word file for offline purposes. One of the popular among them is the PDF file format. PDF is known for preserving text and graphics quality and can be used to send non-editable documents. In this article, we will share how to convert Google Docs to PDF.
How to Convert a Google Docs to PDF on Computer:
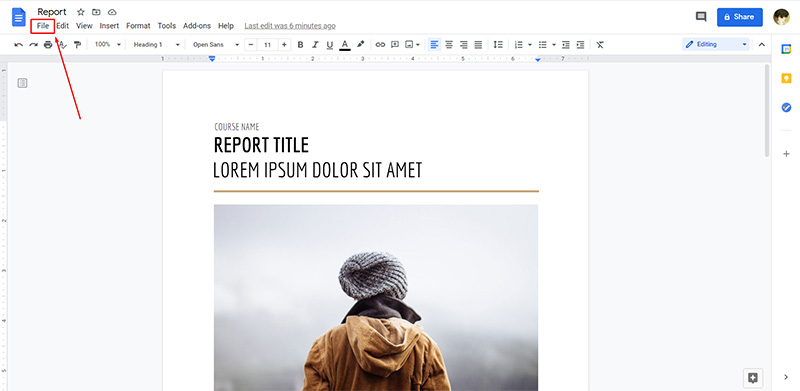
1. Open the document in Google Docs on your browser and click on File.
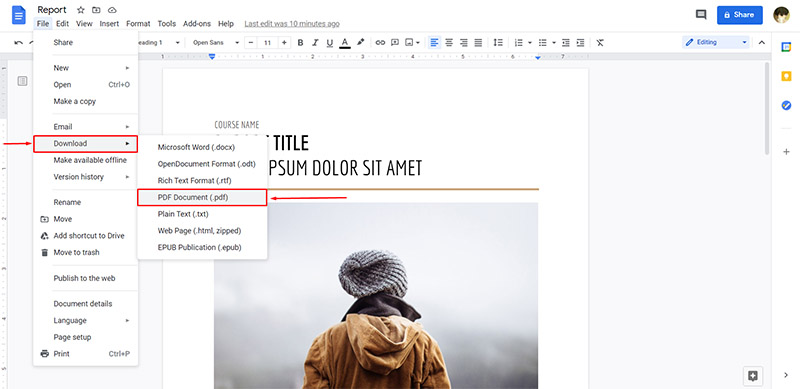
2. Click on Download > PDF Document(.pdf)
3. The PDF file will begin to download on your device, which you can later find in your downloads folder.
How to Convert a Google Docs to PDF on Andriod:
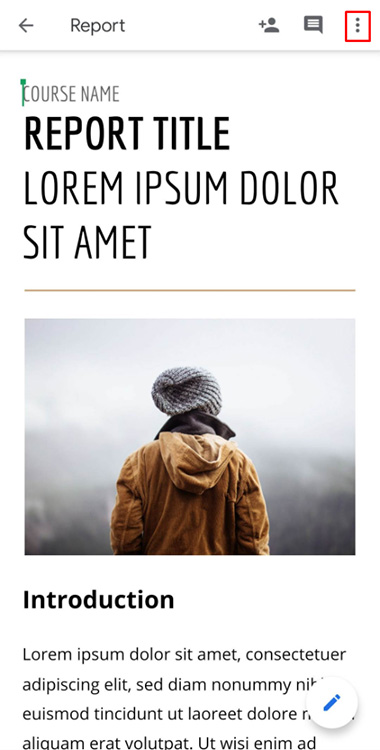
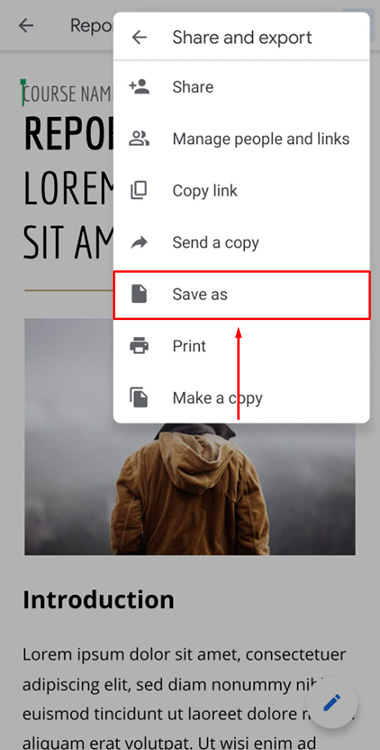
1. Open the document in the Google Docs app on Android and tap on the three dots icon in the upper right corner.
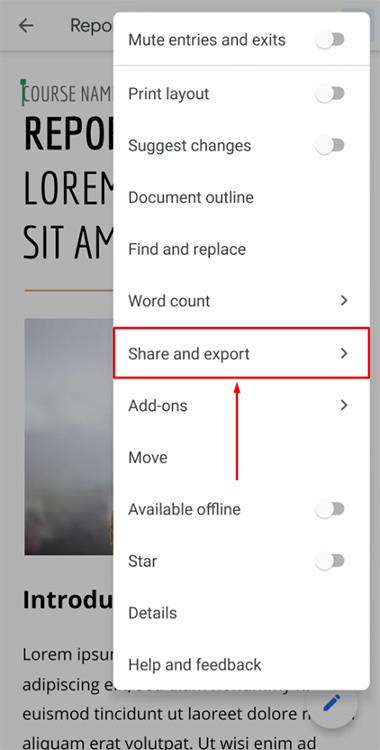
2. Tap on Share and export.
3. Tap on Save as.
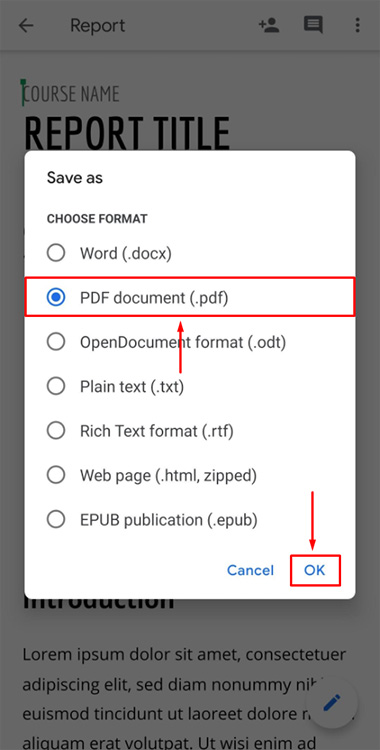
4. Select the the PDF document (.pdf) option and tap on OK.
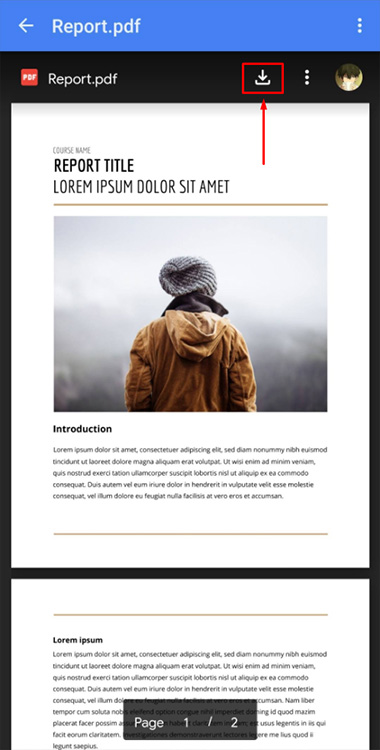
5. Google Docs will automatically save the file in your Google Drive and show you the file preview. Tap on the Download icon.
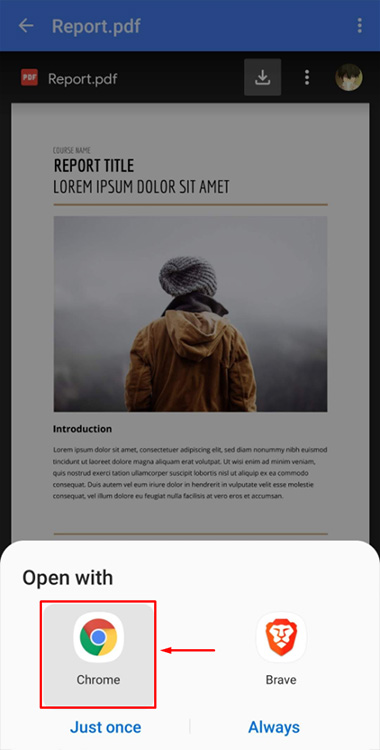
6. If you get an Open With option, tap on any browser present in the list. I am selecting Google Chrome.
7. Once again, you might get an Open With option. Again tap on any browser present in the list.
8. The PDF file will begin to download on your device, which you can later find in your downloads folder.
The post How to Convert Google Docs to PDF appeared first on Bound To Tech.
]]>The post How to Forward Emails from Outlook.com appeared first on Bound To Tech.
]]>There comes a time when users move from one email provider to another. In this case, if you are an Outlook.com email user and decided to move to another like Gmail, then you should make sure that you are not leaving your Outlook emails unchecked. The best way to do this is to automate and forward emails from Outlook to your current email. Here in this article, we will share two ways to forward emails from Outlook.com.
How To Forward All Emails from Outlook.com to Another Email Address:
1. Sign in to Outlook.com in your web browser and click on the Settings icon in the top right corner.
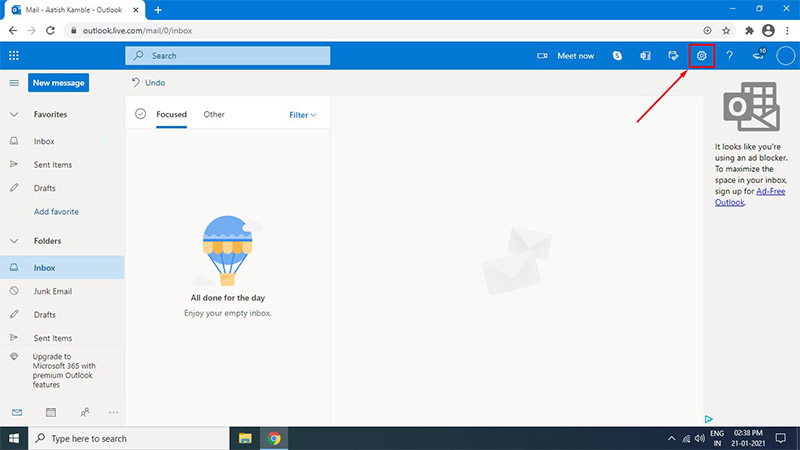
2. From the Settings drop-down menu, click on View all Outlook settings.
3. In the Settings popup menu, click on Mail > Forwarding.
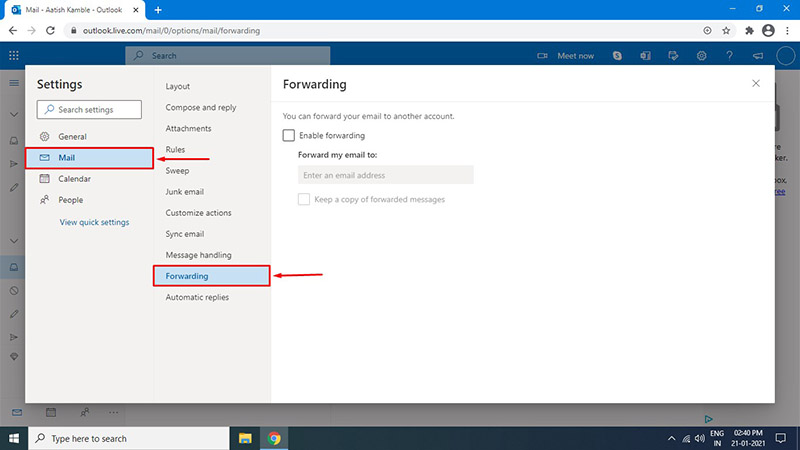
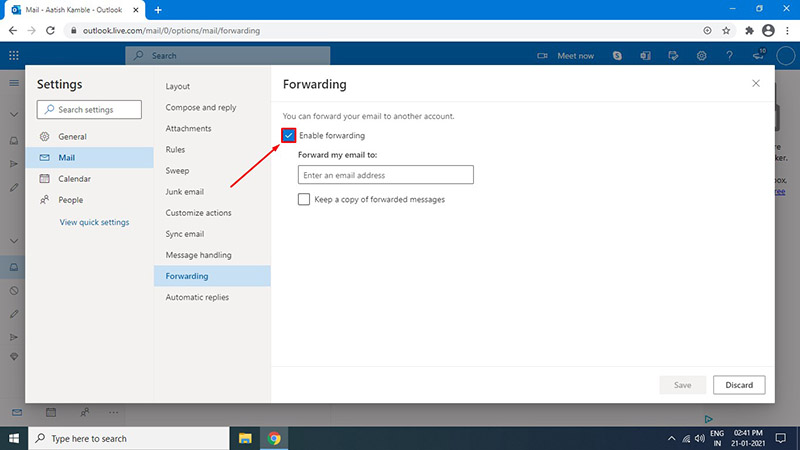
4. Tick the Enable forwarding checkbox
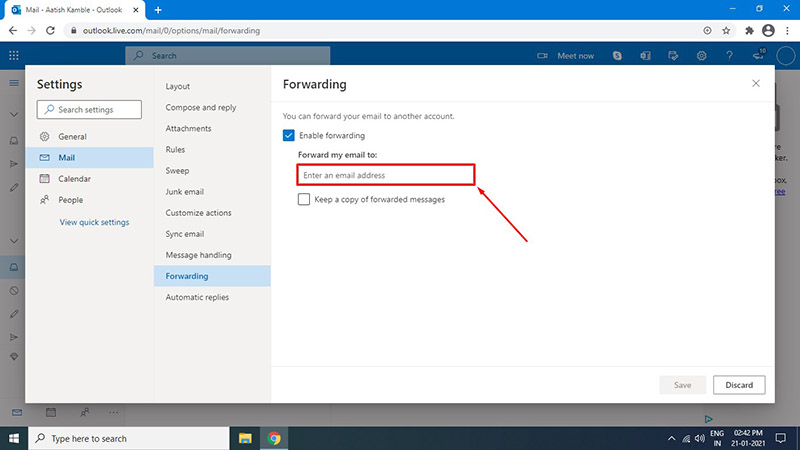
5. Enter the email address where you want Outlook to forward all the emails.
6. Tick the Keep a copy of forwarded messages checkbox, or else Outlook will delete all the forwarded emails.
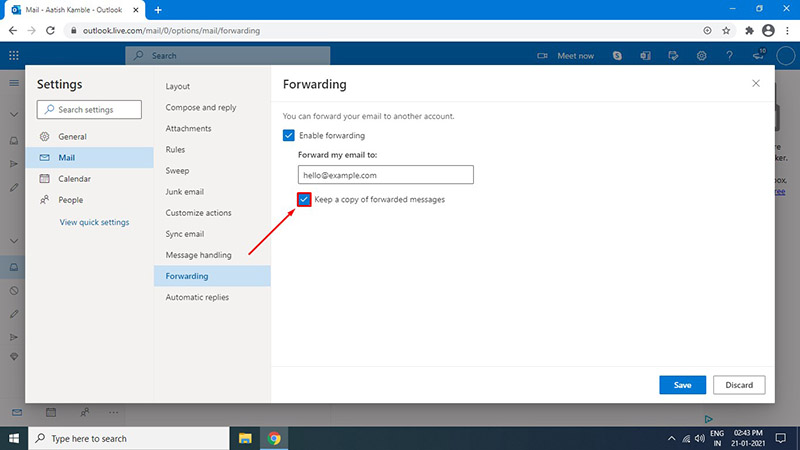
7. Click on Save, and you are done. From now on, all your emails from Outlook.com will be forwarded to a new email.

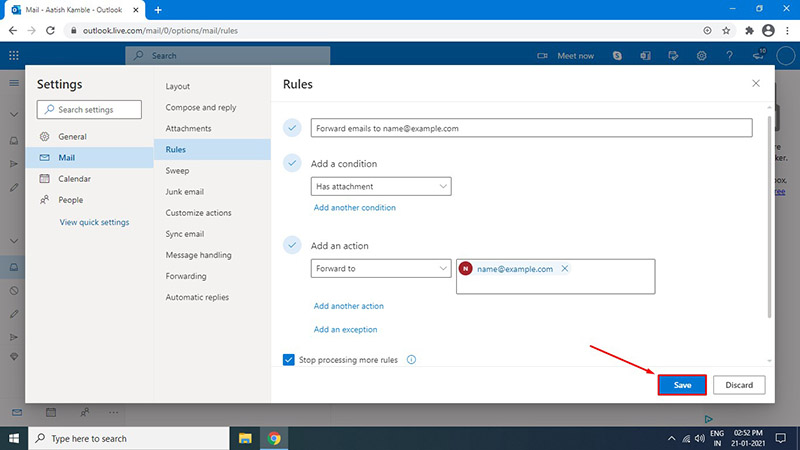
How To Forward Specific Emails from Outlook.com to Another Email Address:
1. Sign in to Outlook.com in your web browser and click on the Settings icon in the top right corner.
2. From the Settings drop-down menu, click on View all Outlook settings.
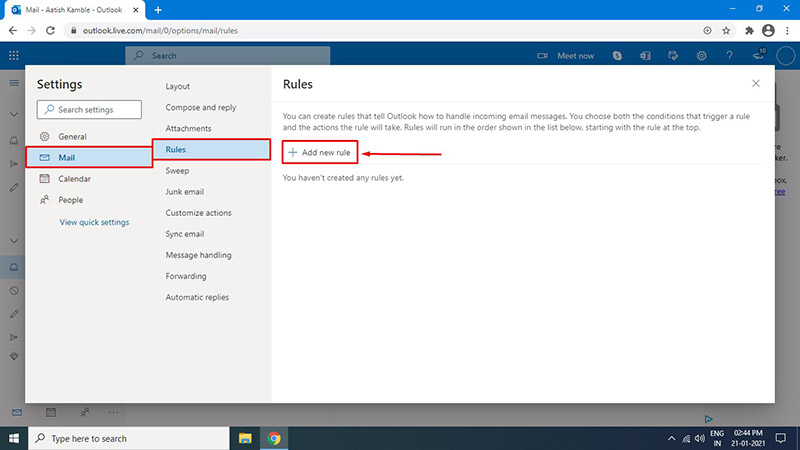
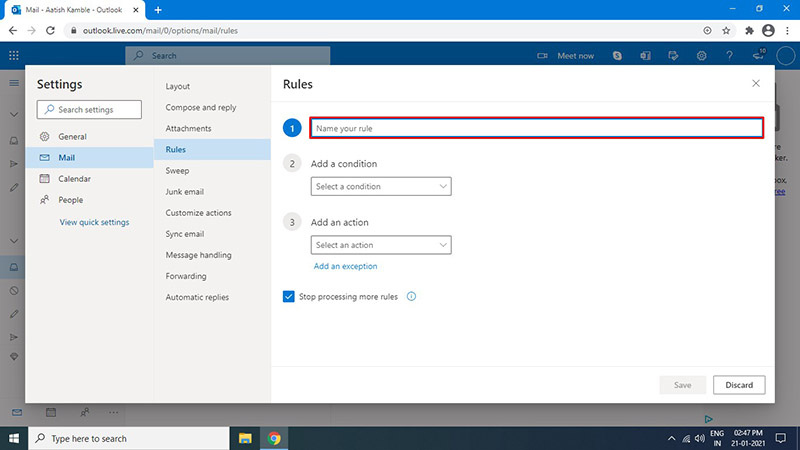
3. In the Settings popup menu, click on Mail > Rules. Then click on + Add new rule.
4. Enter a descriptive name for the rule. E.g., Forward emails to [email protected].
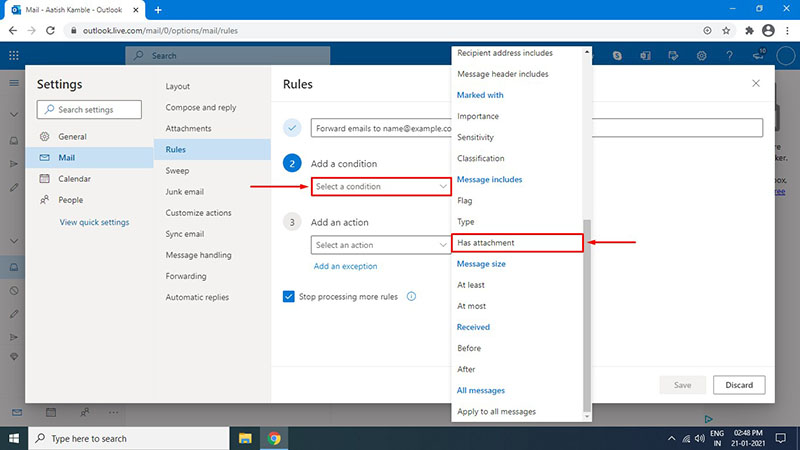
5. From the Add a condition dropdown menu, choose a condition for the specific email you want to be forwarded. It can be From People, Subject, Body. For the tutorial purpose, we will use the Has attachment condition. That mean’s only the mails with an attachment will be forwarded. You can add several more conditions to make the email forward as specific as possible.
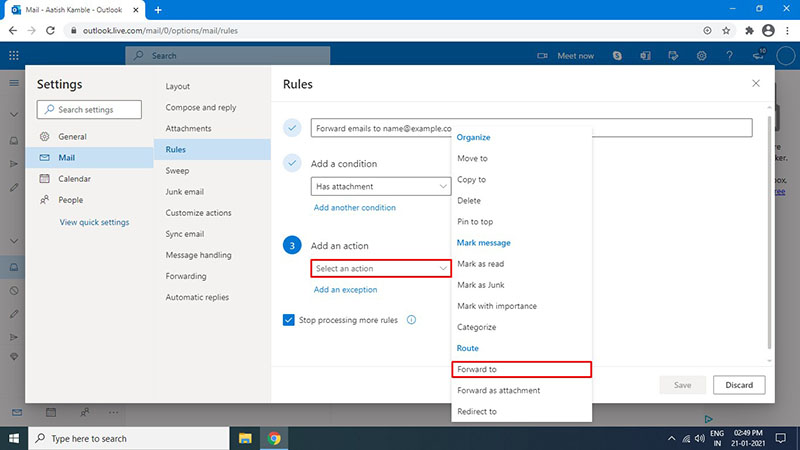
6. From the Add an action dropdown menu, choose Forward to.
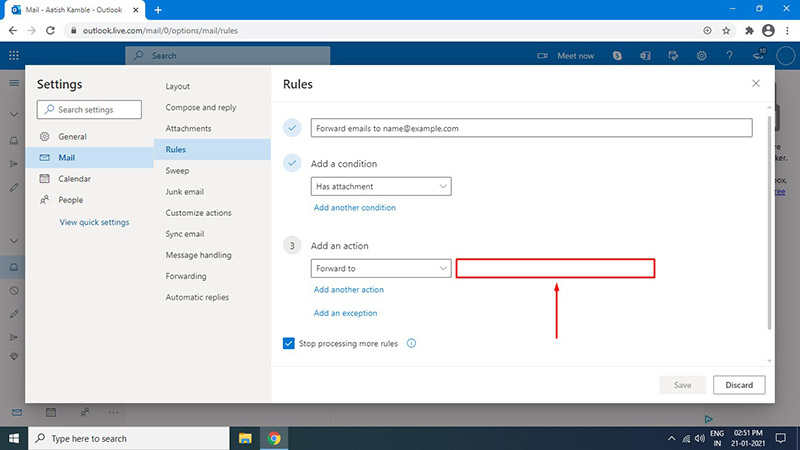
7. Enter your new email where you want Outlook emails to be forwarded.
8. Click on Save, and you are done. From now on, emails from Outlook.com will be forwarded to a new email.
The post How to Forward Emails from Outlook.com appeared first on Bound To Tech.
]]>The post How to Save One Page of a PDF appeared first on Bound To Tech.
]]>PDFs are a handy file format that preserves the quality of graphics and texts and doesn’t rely on some paid software to open it. One single PDF file can store countless pages, but it’s not recommended to send PDF with too many pages. If you are among the unlucky ones who have a PDF with too many pages but are only interested in only one page from it, it’s best to split and save one page of the PDF separately.
This article contains two methods that will help you save one page of the PDF, and it doesn’t matter if you are using Windows, Mac, or Linux. One of the methods relies on free software, and the second one depends on the free internet tool.
Method 1: Save a Single Page of a PDF Using Google Chrome
You can use any PDF software like Adobe Acrobat Reader, Microsoft Word, etc for this method. I am using Google Chrome for this tutorial because Chrome is installed on almost all computers and doesn’t require any additional plugin or extension to do the job. Here’s how you can save a single page from a PDF using Google Chrome:
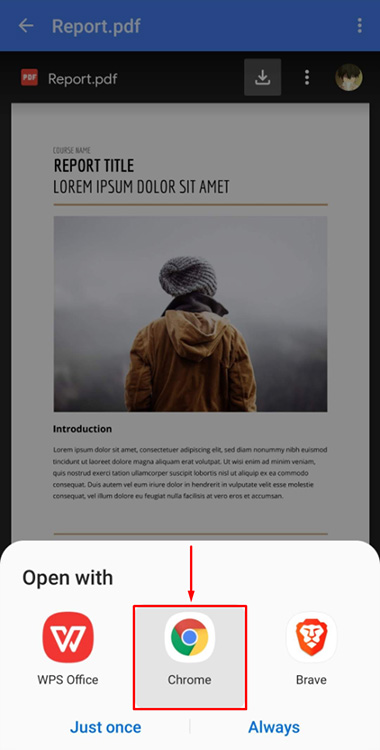
1. Right-click on the PDF file and select Open with > Google Chrome.
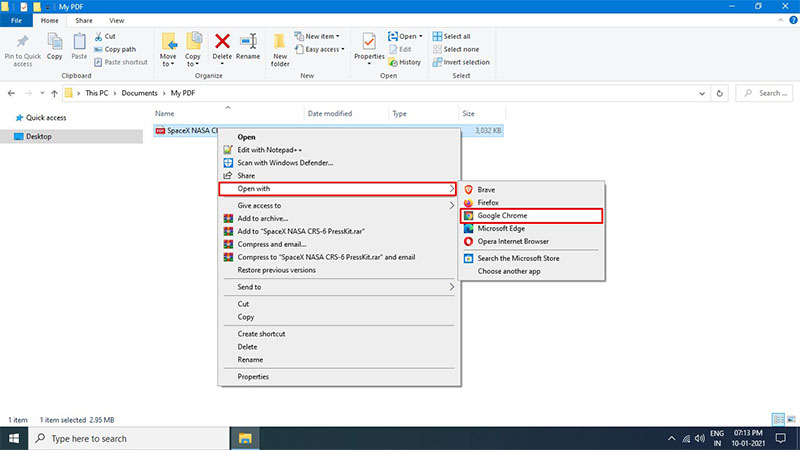
Note: If you don’t see Google Chrome in the Open with section, click on Choose another app, and there you should find Chrome.
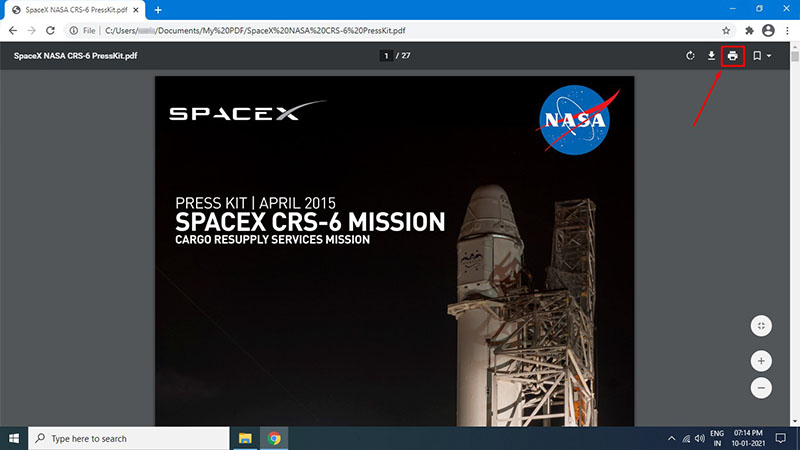
2. Once the file opens in Google Chrome, click on the Print icon in the top right corner.
3. In the Destination drop-down menu, select Save as PDF.
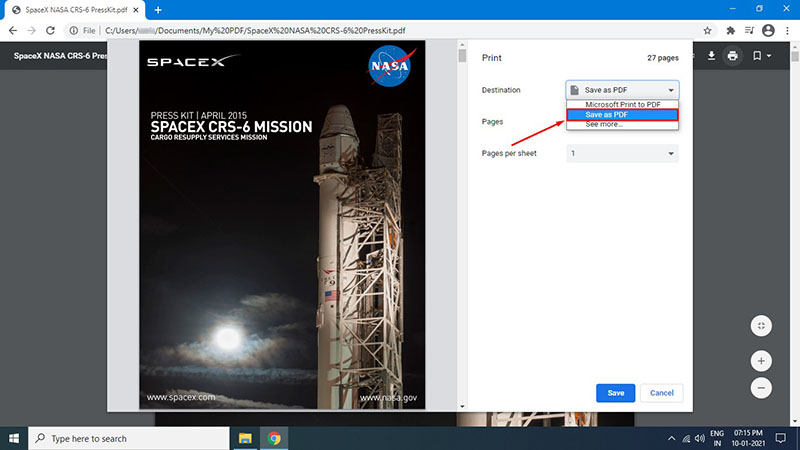
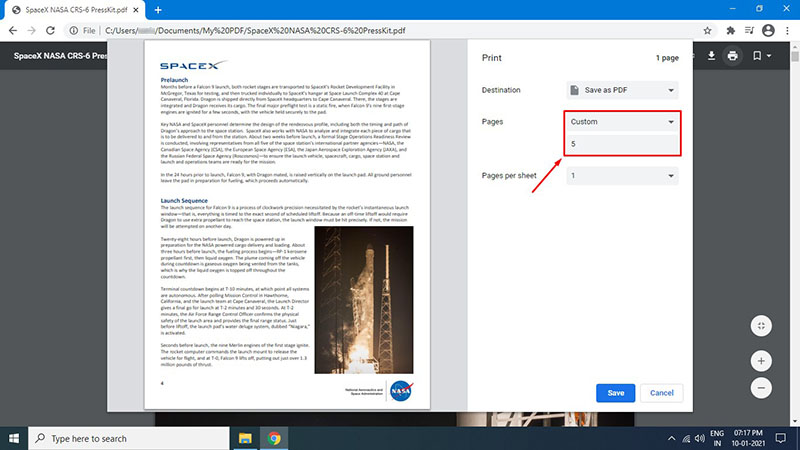
4. In the Pages drop-down menu, select Custom and enter the page number you want to save separately.
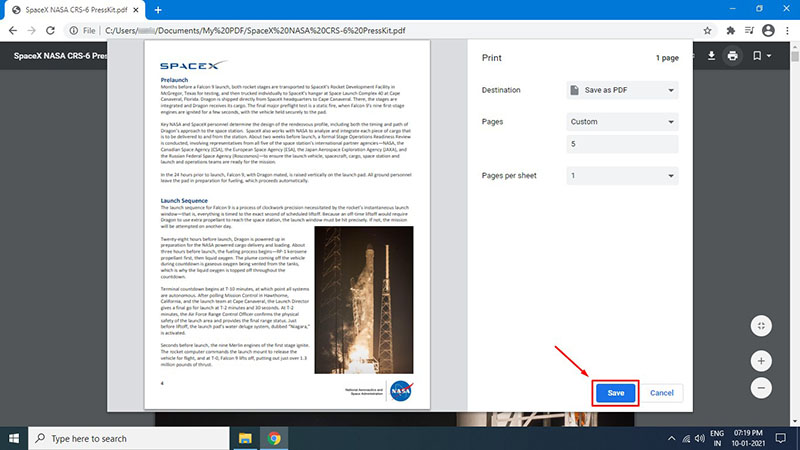
5. Click on the Save button.
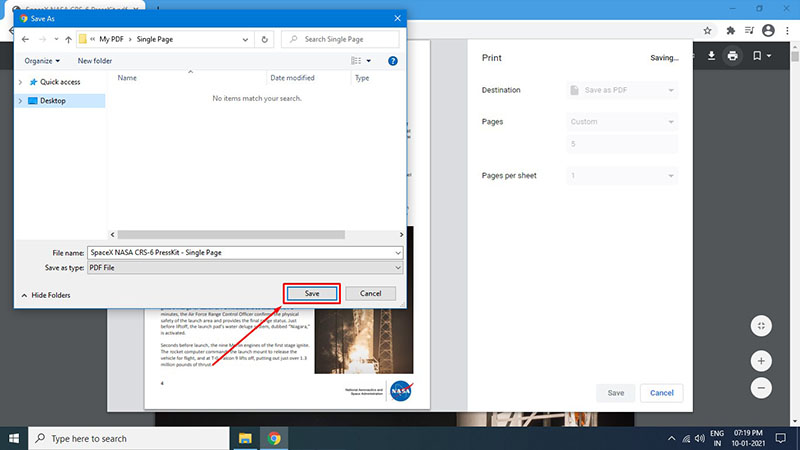
6. Browse where you want the save the file and then click on the Save button.
Method 2: Save a Single Page of a PDF Using Online Tool
If you are one of the minorities who doesn’t use Chrome, you can always use online PDF tools. There are countless tools for PDF, Google it, and you’ll find it. In this tutorial, I am using iLovePDF.com because it is free and reliable. Here’s how you can save a single page from a PDF using an online tool:
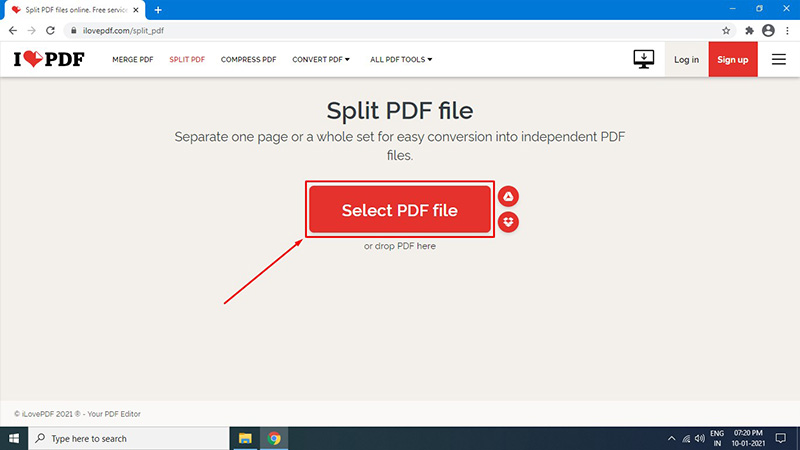
1. Go to https://www.ilovepdf.com/split_pdf
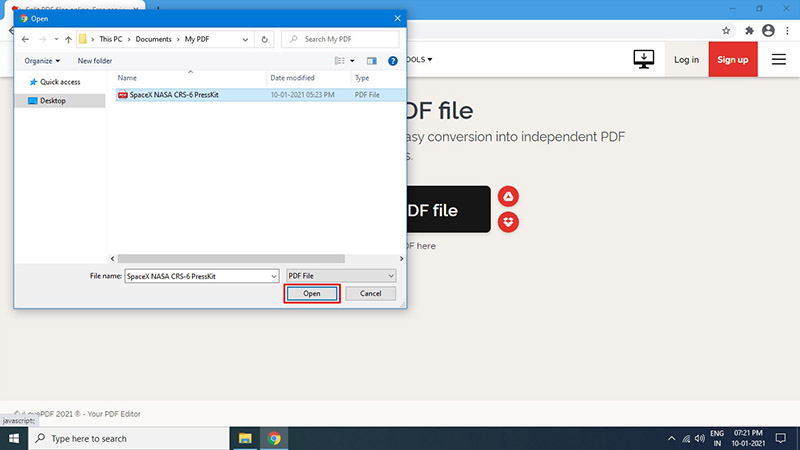
2. Click on the Select PDF file button.
3. Locate the PDF file and click on the Open button.
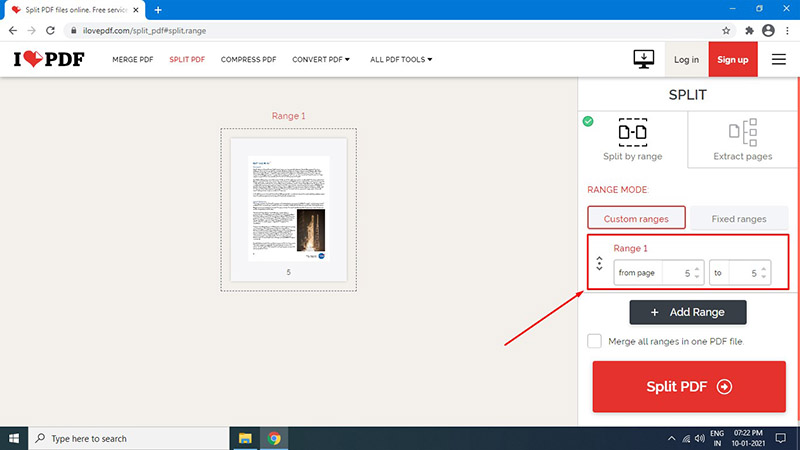
4. On the left side, below the Range Mode, enter the page number you want to save separately.
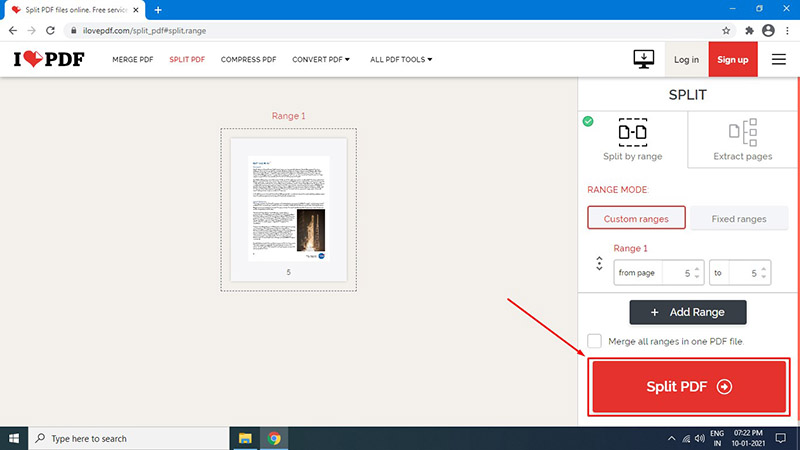
5. Click on the Split PDF button.
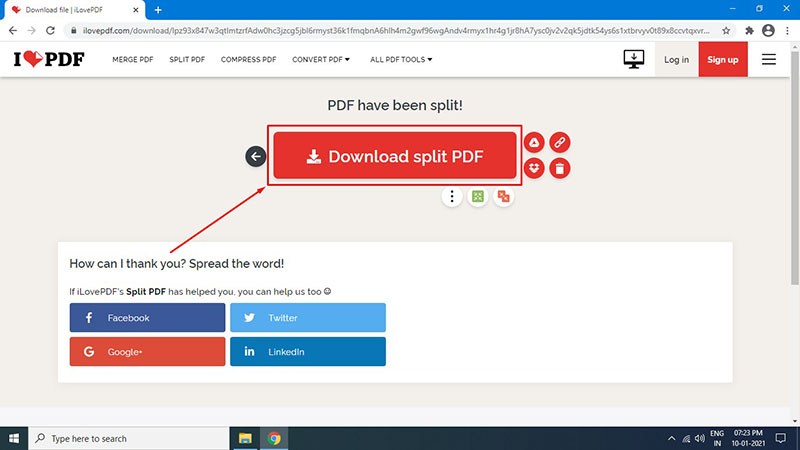
6. Once the splitting process is finished, click on the Download Split PDF button.
The post How to Save One Page of a PDF appeared first on Bound To Tech.
]]>